Advanced Remote Access: Implementing NAT-less Bidirectional Communication with SIM-Based Routing

Historically, accessing an IoT device on a subnet behind a cellular router required significant manual effort. Engineers had to configure complex port forwarding, maintain specialized tunnels, or manage intricate router settings.
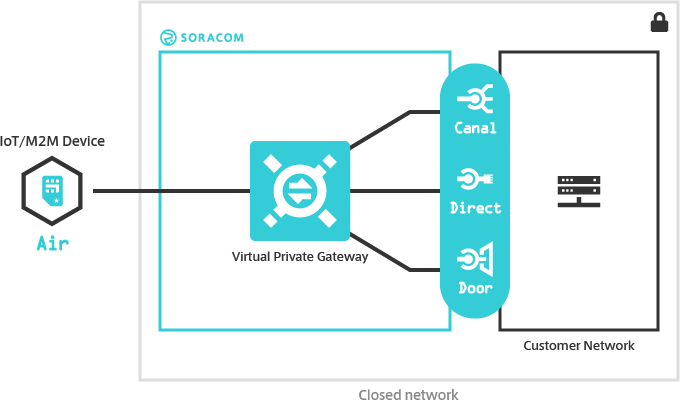
With the introduction of Soracom’s SIM-based routing, you can now link a specific SIM card to its router’s Local Area Network (LAN) IP range, allowing the SIM itself to serve as the routing destination. When combined with Soracom Gate, this feature enables a seamless L2/L3 environment across your cellular fleet – drastically reducing the time and cost associated with maintaining inter-site connections and IoT gateways.
The Network Configuration
In this guide, we will walk through a robust network architecture that leverages the Soracom suite to achieve direct, NAT-less communication.
Technical Stack
| Component | Specification |
| IoT SIM | Soracom Air for Cellular (plan01s) |
| IoT Device | Raspberry Pi |
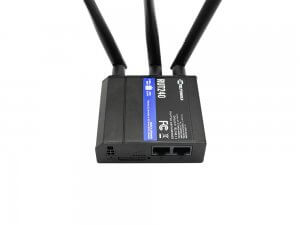
| Cellular Router | Teltonika RUT240 *1 |
| Cloud Environment | Amazon VPC |
| Gate Peer / Server | Amazon EC2 (Ubuntu or Amazon Linux 2) |
*1 The router being used must support packet forwarding and NAT/Masquerading control
Key Benefits
- True Bidirectional Communication: Seamless access between IoT devices behind the router and cloud-based servers.
- Scalability: Supports many-to-many communication that grows effortlessly with your device fleet.
- Source IP Preservation: By eliminating NAT, the server sees the actual LAN IP of the IoT device, simplifying logging and security filtering.
While this guide utilizes AWS using Soracom Canal to connect to a VPC, the same architecture can be implemented on Azure using Soracom Door to connect to an Azure VPN Gateway.
Configuration Procedure
Step 1. Configure the Router and IoT Device
Goal: Establish basic connectivity between the IoT device and the Virtual Private Gateway (VPG).
- Create a VPG Type-F: (Reference: VPG Type-F Configuration)
- Ensure the VPG device subnet (default 10.128.0.0/9) does not overlap with your existing cloud or LAN networks.
- Add the Router’s SIM to the VPG:
- Add the SIM to a group (Reference: Groups)
- Associate the group with the VPG (Reference: VPG Basic Settings)
- Configure the Router APN: Set up your RUT240 to connect to Soracom. (Reference: RUT240 Setup Guide)
- Connect the Raspberry Pi: Connect the Pi to the router’s LAN.
Verification: Confirm the SIM is active in the Soracom User Console and that the Pi can successfully ping pong.soracom.io.
Step 2. Configure Soracom Canal
Goal: Bridge your AWS VPC with the Soracom VPG.
- Deploy Cloud Resources: Create your VPC and EC2 Gate Peer.
- Ensure your AWS Routing Tables and Security Groups to allow ICMP traffic for testing.
- Establish Peering: Link the VPG and VPC using Soracom Canal. (Reference: VPC Peering with Soracom Canal)
Step 3. Configure Soracom Gate C2D
Goal: Create a virtual L2 bridge between the Cloud and the Router.
- Configure A Gate Peer: (Reference: Gate Peer Configuration)
- Ensure UDP Port 4789 (VXLAN) is open in your AWS Security Group to allow Soracom traffic and that packet forwarding has been configured (Reference: Packet Forwarding Configuration)
- Confirm Remote Device Access: Confirm that you are able to remotely access the RUT240 attached to your VPG (Reference: Confirm Remote Device Access)
Step 4. Configure SIM-Based Routing
Goal: Enable the VPG to recognize the LAN subnet behind your cellular router.
- Enable IP Forwarding: Configure the cellular router to forward packets between its WAN and LAN.
- Enable SIM-Based Routing: Configure the VPG to route traffic destined for the LAN (e.g.,
192.168.1.0/24) through the specific SIM. (Reference: SIM-Based Routing)
Step 5. Configure Soracom Junction Redirection
Goal: Direct outbound device traffic through the Gate Peer for consistent routing.
- Set Up Redirection: (Reference: Configure Junction Redirection)
- Disable EC2 Source/Destination Checks
- Because the Gate Peer acts as a router (forwarding packets that aren’t addressed to its own IP), AWS will drop that traffic by default. In the AWS Management Console, go to your Gate Peer EC2 instance. Select
Actions > Networking > Change source/destination check.Set it toDisable.
- Because the Gate Peer acts as a router (forwarding packets that aren’t addressed to its own IP), AWS will drop that traffic by default. In the AWS Management Console, go to your Gate Peer EC2 instance. Select
- Enable Packet Forwarding on the Gate Peer
- The Gate Peer must be configured to pass traffic between the VPG and the VPC. Run the following command on your Gate Peer:
sudo sysctl -w net.ipv4.ip_forward=1
- The Gate Peer must be configured to pass traffic between the VPG and the VPC. Run the following command on your Gate Peer:
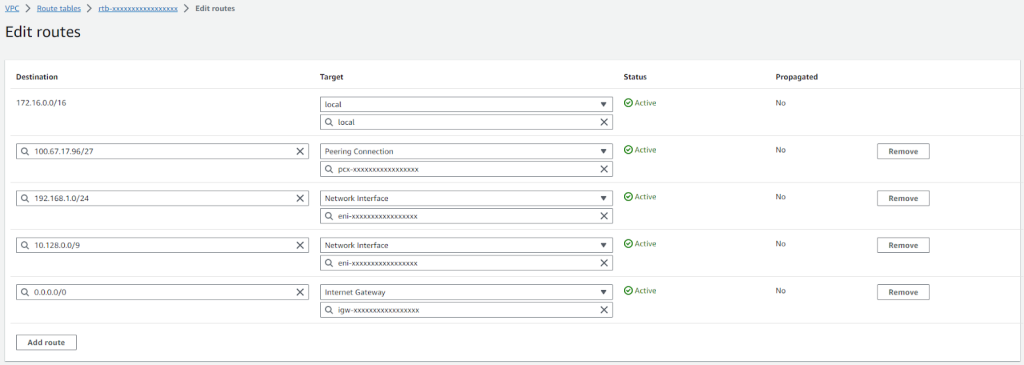
- Configure the Server Subnet Routing Table
- The cloud server needs to know that the path to the IoT devices is through the Gate Peer. You must update the Routing Table associated with the Server’s subnet (not the Gate Peer’s subnet) with these entries:
- The cloud server needs to know that the path to the IoT devices is through the Gate Peer. You must update the Routing Table associated with the Server’s subnet (not the Gate Peer’s subnet) with these entries:
| Destination | Target |
| 172.16.0.0/16 | local (Internal VPC traffic) |
| 100.67.xx.xx/27 | Peering Connection (Direct VPG connection) |
| 192.168.1.0/24 | Network Interface (ENI of the Gate Peer) |
| 10.128.0.0/9 | Network Interface (ENI of the Gate Peer) |
Verification: Confirming Bidirectional Communication
Before moving to Step 6 (disabling NAT), verify that the routing is working. Note that at this stage, the server will still see the Router’s IP as the source because NAT is still active.
Test 1: IoT Device to Server From your Raspberry Pi, ping the cloud server: ping 172.16.1.10 -c 4
Test 2: Server to IoT Device From your EC2 Server, ping the Raspberry Pi behind the router: ping 192.168.1.10 -c 4
Step 6. Disable NAT on the Router
Goal: Achieve a “transparent” network where source IPs are preserved.
- Disable Masquerading: On the RUT240, navigate to Network > Firewall > Zones and turn Masquerading OFF for all zones.
Final Verification:
- Packet Capture: Run
sudo tcpdump -i enX0 -n icmpon your server. - The Result: When you ping the server from the Raspberry Pi, the server will now see the source address as
192.168.1.10(the actual device IP) instead of the router’s cellular IP.
Summary
While NAT has long been a staple of networking, it often introduces unnecessary complexity in IoT architectures. By integrating Soracom Gate, Junction, and SIM-based Routing, organizations can build a transparent, secure, and bidirectional network that functions like a local office LAN, regardless of where the devices are deployed globally.