How to Quickly Configure Your ESP32-S3 Walter with Soracom
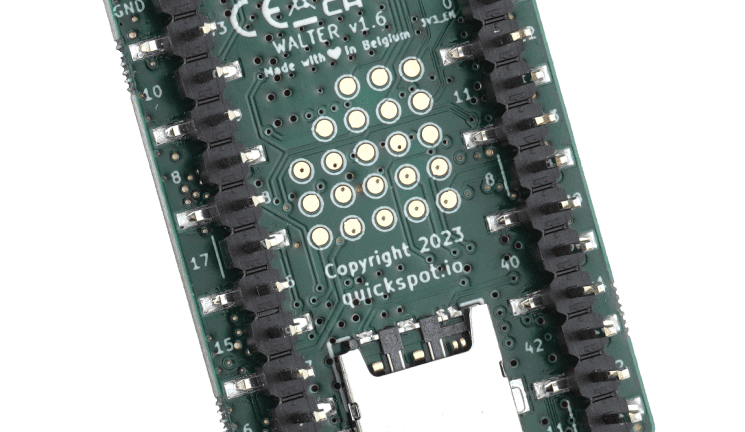
Soracom partner DPTechnics has a fantastic new product ideal for both low-power and compute-intensive scenarios: the Walter. The Walter combines an ESP32-S3 development board, the Sequans Monarch 2 NB-IoT/LTE-M modem, and a GNSS module to create a multifunctional cellular development board. With support for Arduino C++, Micropython, Espressif IoT Development Framework, and more, there is no shortage of development tools and knowledge bases to draw upon for application development.
In this blog, we will be showcasing two ways the Walter can be used in conjunction with Soracom services to create an IoT device that can be quickly reconfigured to send data to new endpoints. Please note that these examples are applicable only when using a Soracom SIM that is registered to an individual account (Operator ID). In these examples, we will only be sending the Walter’s MAC address as data, but the sketches can be adapted to send data from sensors or even the Walter’s GPS module to suit your own projects as needed.
Preparing the Walter
First, we need to prepare our Arduino development environment for use with Walter by following these steps:
1. Download and install the Arduino IDE. This integrated development environment will allow you to properly upload Arduino sketches to the Walter.
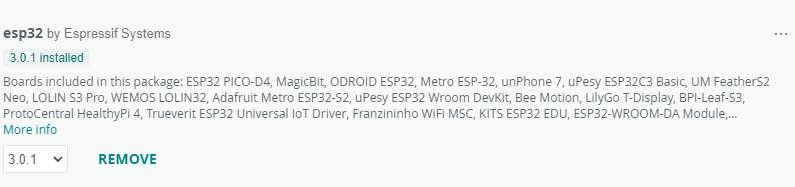
2. After installing the IDE, you will need to add support for the ESP32 using the Arduino IDE’s Board Manager. To do so, follow the instructions for “Installing using Arduino IDE” in Espressif’s installation guide.
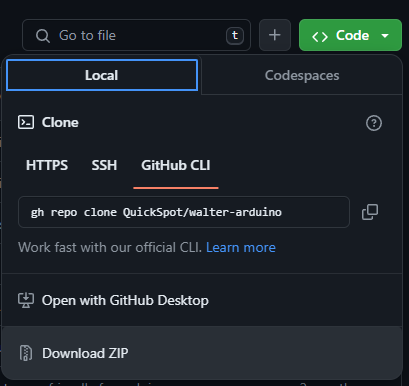
3. Next, you will need to install the Walter-specific Arduino code libraries. To do so, clone the walter-arduino repository to the Arduino libraries directory. The default directory locations are as follows:
- Windows:
%USERPROFILE%\Documents\Arduino\libraries - Mac OSX:
~/Documents/Arduino/libraries - Linux:
~/sketchbook/libraries
To do this easily, click Download ZIP from the Github page’s Code dropdown menu, and extract the walter-arduino-main folder into your libraries directory.
4. Next, connect the Walter board to the computer and configure the following settings in the IDE under the Tools menu. If any of these options are missing, ensure Step 2 was followed correctly and restart the Arduino IDE:
- Board:
ESP32S3 Dev Module - Port: Whichever COM port your Walter is connected to
- USB CDC On Boot:
Enabled - CPU Frequency:
240MHz (WiFi) - Core Debug Level: Whichever level you choose
- USB DFU On Boot:
Disabled - Erase All Flash Before Sketch Upload:
Enabled - Events Run On:
Core 1 - Flash Mode:
QIO 80MHz - Flash Size:
16MB (128Mb) - JTAG Adapter:
Integrated USB JTAG - Arduino Runs On:
Core 1 - USB Firmware MSC On Boot:
Disabled - Partition Scheme:
Huge APP (3MB No OTA/1MB SPIFFS) - PSRAM:
QSPI PSRAM - Upload Mode:
UART0 / Hardware CDC - Upload Speed:
921600 - USB Mode:
Hardware CDC and JTAG - Zigbee Mode:
Disabled
Now that the IDE has been configured, we can move on.
Example 1: MQTT
The communication protocol used in this sketch is MQTT, and the MQTT broker being used is HiveMQ. MQTT is designed to minimize network bandwidth and device resource usage, making it ideal for environments where IoT devices may face limitations on processing power and challenges to battery life.
Though this example will only involve publishing from the Walter board itself, the publish/subscribe model of MQTT can also facilitate scalable and flexible communication by allowing devices to send and receive messages through a central broker without direct connections. HiveMQ, serving as this broker, efficiently manages the distribution of messages, ensuring reliable and real-time data exchange. This architecture can easily scale to support a large number of simultaneous connections, which can be crucial for IoT deployments that ramp up over time.
Moreover, HiveMQ provides essential security features, including TLS/SSL encryption support, authentication, and the ability to customize permissions on a per-client basis. HiveMQ can also integrate with various cloud platforms and enterprise systems, enhancing its utility and enabling seamless data processing and analysis.
However, instead of sending data directly to the HiveMQ server, this sketch will have the Walter send data to the beam.soracom.io endpoint to take advantage of Soracom Beam. Beam is a proxy service for forwarding data from a device to a specified endpoint, such as the HiveMQ cluster in this example. Proxying with Beam allows users to offload encryption workloads to the cloud, configure endpoints for multiple groups of devices efficiently, and integrate devices with protocol limitations via protocol conversion. Beam can also store endpoint credentials for in the cloud, so if the device were ever compromised, those credentials would still be secure.
In this example, Beam will receive MQTT data from the Walter, add TLS encryption, and forward the MQTTS data to the HiveMQ cluster. Applying this TLS encryption in the cloud reduces the computation resources used by the Arduino (improving the device’s battery), as well as its data usage due to the lack of TLS headers on the packets.
HiveMQ Configuration:
To set up the Hive MQ backend for this example, follow these steps:
1. Create a HiveMQ account
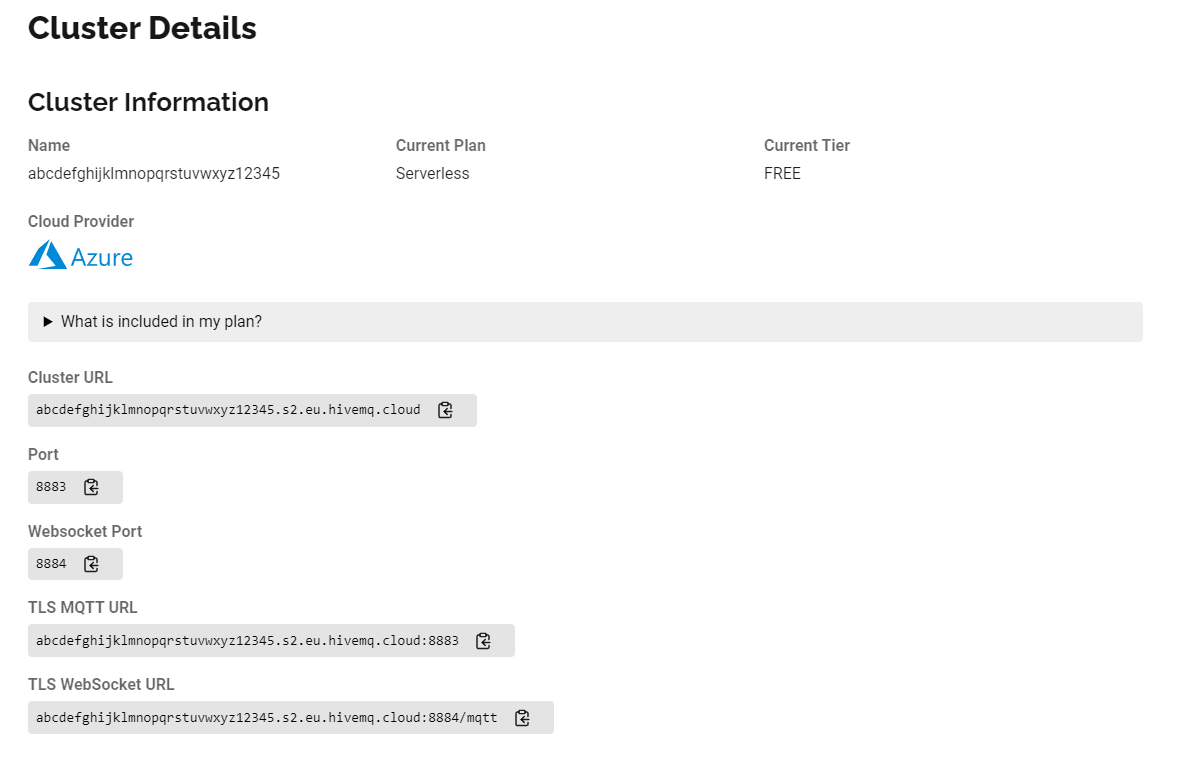
2. Create a free-tier, “Serverless,” cluster and note the provided cluster URL and port, as they will be required for Beam configuration later.
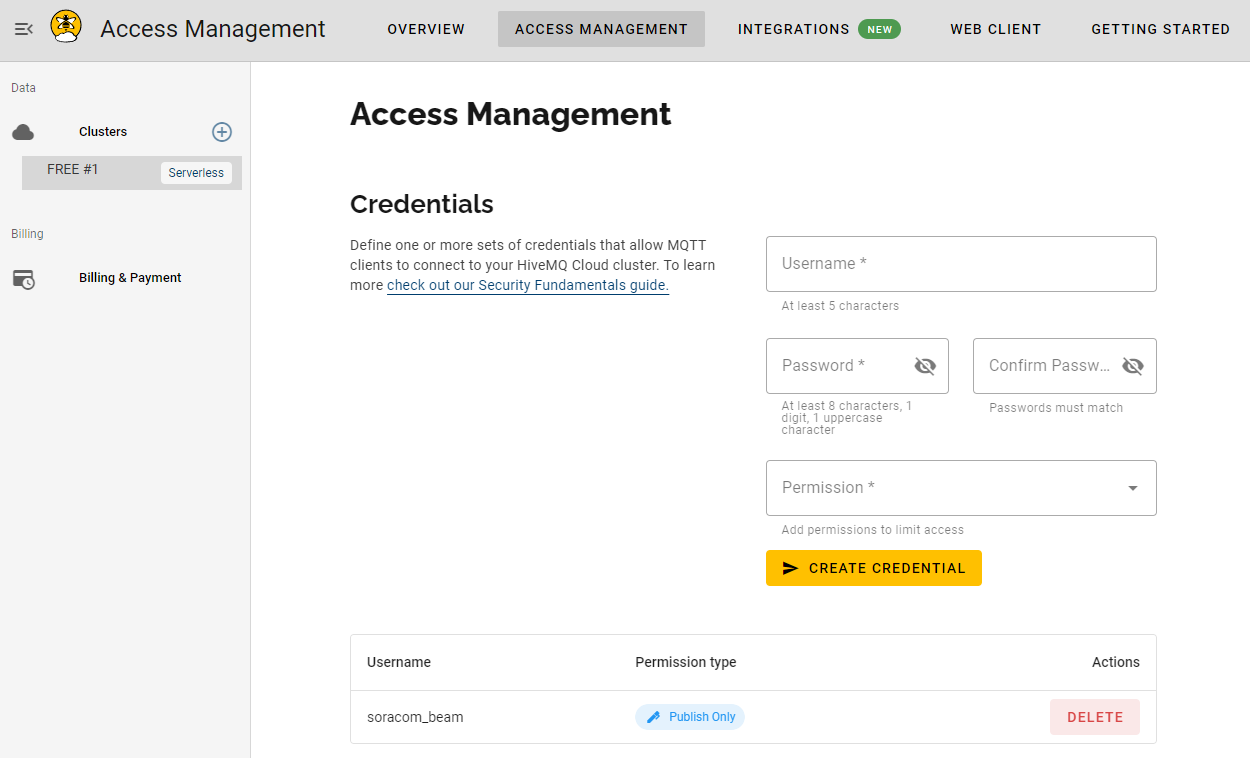
3. Next, navigate to the Access Management tab and create a set of Access Management credentials for use with Soracom Beam with Publish-Only permissions. Make note of the Username and Password; they will also be required for Beam configuration later.
4. To verify that data reaches the HiveMQ cluster, use the HiveMQ web client. Once on the Web Client page, click Connect With Generated Credentials, then Create and Connect to quickly generate credentials and connect the client to the cluster.
The topic defined in the example will be beamtest, so enter beamtest/# in the Topic Subscriptions field. The # wildcard is necessary to subscribe to subtopics, as our Beam configuration will automatically append the SIM IMSI to the topic, allowing you to easily determine which device is sending the data. Leave this tab open with the client connected to the web browser while the Beam configuration is completed.
The HiveMQ setup is now complete.
Soracom Beam Configuration:
Please note that Soracom Beam is a paid service that is charged by request, though the first 100,000 requests sent each month are free. For more information, please see Soracom’s Pricing and Fee Schedule.
To set up Soracom Beam for the example, follow these steps:
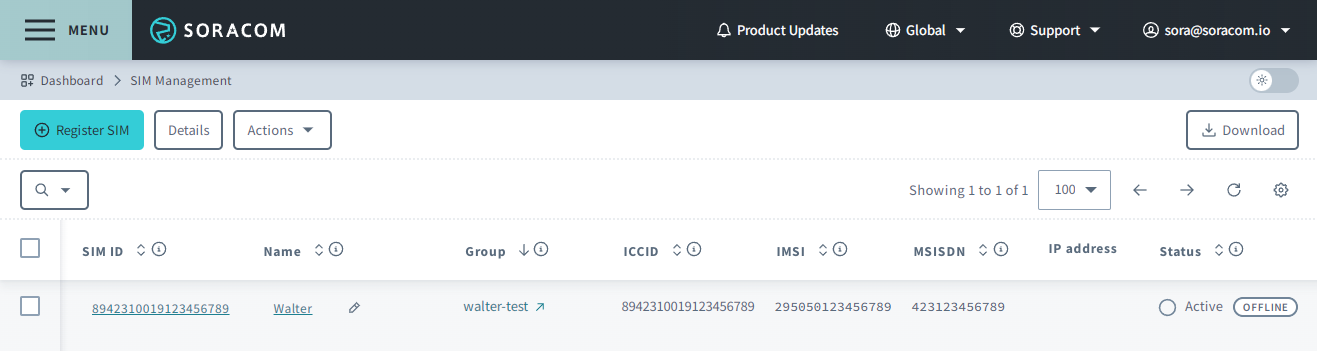
1. If you have not done so already, create a Soracom account and register your Soracom SIM card to your account.
2. Create a Group for your SIM card and assign your SIM to it.
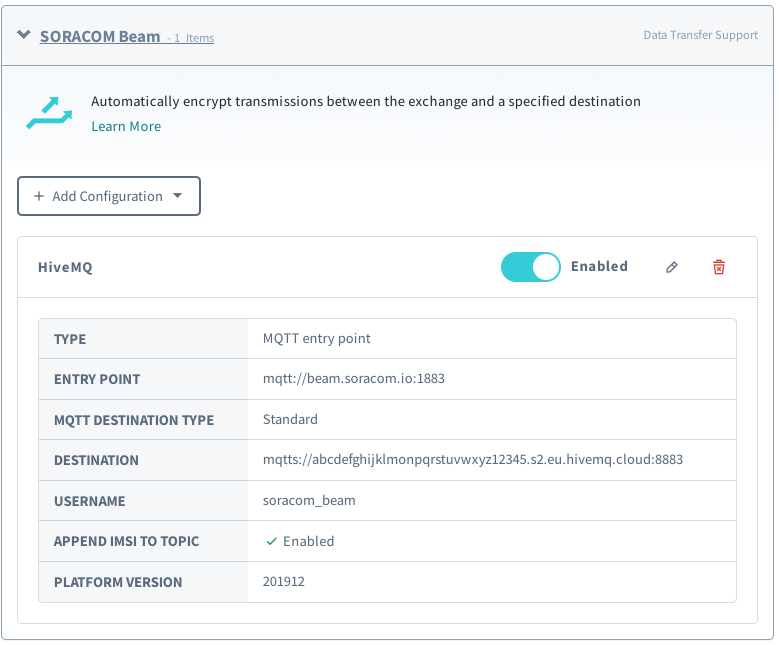
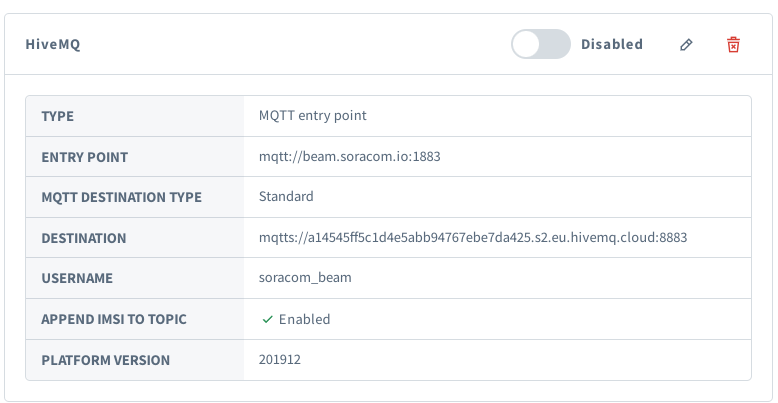
3. Configure a new MQTT Beam entry point in your Group with the following settings. All other settings should be left as default:
- Name –
HiveMQ - Protocol –
MQTTS - Type –
Standard - Host Name – The URL of the HiveMQ cluster
- Port Number – The port number for the HiveMQ cluster
- Username – The username from the credentials set created in HiveMQ access management. For example,
soracom_beam. - Password – The password from the credentials set created in HiveMQ access management.
- Append IMSI to topic –
Enabled
The completed configuration should look like this:
Soracom Beam is now configured for use with our sketch. One of the major benefits of using Beam is that it can redirect traffic to a new endpoint for every device in this group. Your Beam configuration can be quickly modified in the Soracom User Console or via API with just a few clicks with no interaction with the devices required, vastly reducing workload in deployments with thousands of devices.
MQTT Example Sketch
In the Arduino IDE, create a new sketch and paste in the following code:
#include <Arduino.h>
#include <esp_mac.h>

#include <WalterModem.h>

/**

 * @brief The modem instance.

 */

WalterModem modem;

/**

 * @brief Walter ID formed by prefix + MAC address.

 *        Used as the MQTT client ID.

 */

char clientId[25] = "walter-";

/* Fetch Walter's MAC address */

void fetchMacAddress() {

  uint8_t macBuf[6];

  char macStr[18];

  esp_read_mac(macBuf, ESP_MAC_WIFI_STA);

  sprintf(macStr, "%02X:%02X:%02X:%02X:%02X:%02X",

          macBuf[0], macBuf[1], macBuf[2], macBuf[3], macBuf[4], macBuf[5]);

  strcat(clientId, macStr);

  Serial.printf("Walter's MAC is: %s\r\n", macStr);

}

void setup() {

  Serial.begin(115200);

  delay(5000);

  Serial.print("Walter Soracom Beam MQTT test\r\n");

  if(WalterModem::begin(&Serial2)) {

    Serial.print("Modem initialization OK\r\n");

  } else {

    Serial.print("Modem initialization ERROR\r\n");

    return;

  }

  fetchMacAddress();

  WalterModemRsp rsp = {};

  /* Create PDP context */

  if(modem.createPDPContext("soracom.io", WALTER_MODEM_PDP_AUTH_PROTO_PAP))

  {

    Serial.print("Created PDP context\r\n");

  } else {

    Serial.print("Could not create PDP context\r\n");

    return;

  }

  /* Set the operational state to full */

  if(modem.setOpState(WALTER_MODEM_OPSTATE_FULL)) {

    Serial.print("Successfully set operational state to FULL\r\n");

  } else {

    Serial.print("Could not set operational state to FULL\r\n");

    return;

  }

  /* Wait for the network to become available */

  WalterModemNetworkRegState regState = modem.getNetworkRegState();

  while(!(regState == WALTER_MODEM_NETWORK_REG_REGISTERED_HOME ||

          regState == WALTER_MODEM_NETWORK_REG_REGISTERED_ROAMING))

  {

    delay(100);

    regState = modem.getNetworkRegState();

  }

  Serial.print("Connected to the network\r\n");

  /* Configure MQTT connection */

  if(modem.mqttConnect("beam.soracom.io", 1883, clientId)) {

    Serial.print("MQTT connection succeeded\r\n");

  } else {

    Serial.print("MQTT connection failed\r\n");

  }

}

void loop() {

  static uint8_t counter = 0;

  static char outgoingMsg[64] = "";

  sprintf(outgoingMsg, "%s-%d", clientId, counter);

  if(modem.mqttPublish("beamtest", (uint8_t *) outgoingMsg, strlen(outgoingMsg))) {

    Serial.printf("Published '%s' on topic 'beamtest'\r\n", outgoingMsg);

  } else {

    Serial.print("MQTT publish failed\r\n");

  }

  counter++;

  delay(10000);

}Code language: PHP (php)
Next, connect the Walter board to your computer. Be sure that the board settings configured earlier in the article are still set, then upload the sketch.
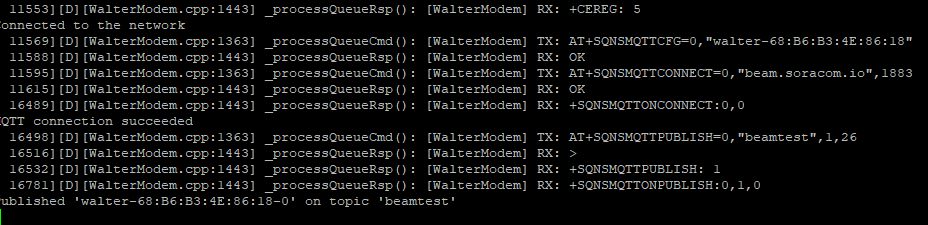
After the IDE shows that the sketch has been uploaded, the Walter will reset and it should begin running. Using the IDE’s built-in serial monitor tool (or another serial terminal application such as PuTTY) set to 921600 baud, we can view the logging from the sketch while it runs. After the APN has been configured, the connection to the network has been established, and the PDP context activated, the Walter will connect to Beam and publish the MQTT data:
The MQTT data will then have TLS encryption added in the cloud and be forwarded to the HiveMQ MQTTS endpoint. The arrival of the data can be verified by using the connected web client where the sent data will be shown, and the IMSI of the sending SIM can be quickly checked by looking at the topic:

Example 2: HTTP
The second example will use HTTP to demonstrate how devices using Soracom SIM cards can easily switch configurations and the services being used with the Unified Endpoint feature. Unified Endpoint is a consolidated ingress endpoint service that provides data redirection to several Soracom services through a single endpoint. In our example, it will be used in conjunction with Soracom Harvest Data, a data collection and visualization service. Harvest Data stores data and generates visualizations that can be accessed directly from the User Console. Custom dashboards for viewing data sent to Harvest Data can also be created with Soracom Lagoon, though that process will not be shown in our example.
Harvest Data will be enabled initially to mimic a development and testing environment, allowing for rapid verification that the device is sending the expected data without having to configure a backend from another provider. Once the testing is complete, a Soracom Beam HTTP entry point will be configured so that data can be encrypted in the cloud with TLS then sent to a new endpoint of your choice. While traffic could be directed to Harvest Data or Beam using their own unique endpoints, Unified Endpoint allows traffic to be automatically routed to the appropriate enabled services without the need to make changes to the sketch or the deployed device. Instead, a few simple clicks in the Soracom User Console or using our API will be enough to change the configuration of however many devices have been assigned to the Group.
Soracom Harvest Data Configuration
Please note that Soracom Harvest Data is a paid service that incurs charges by both the number of devices using the service and the number of requests made by those devices. Harvest Data’s free tier covers the first 31 device days each month, as well as the first 2000 data requests. This can be used to test Harvest Data for up to 2000 requests with 1 device for a full month, 2 devices for 15 days each, and so on, at no cost. For more information, please see Soracom’s Pricing and Fee Schedule.
As Unified Endpoint is enabled by default for all Groups and is a free feature, it requires no configuration for this example. It will automatically detect that Harvest Data has been enabled and direct traffic to it.
To use Harvest Data, the previously created Group from the MQTT example can be quickly reconfigured with just two steps:
1. Disable the previously configured Beam MQTT Entrypoint in the Group settings page
2. Under the SORACOM Harvest Data header, enable Harvest Data, then click Save
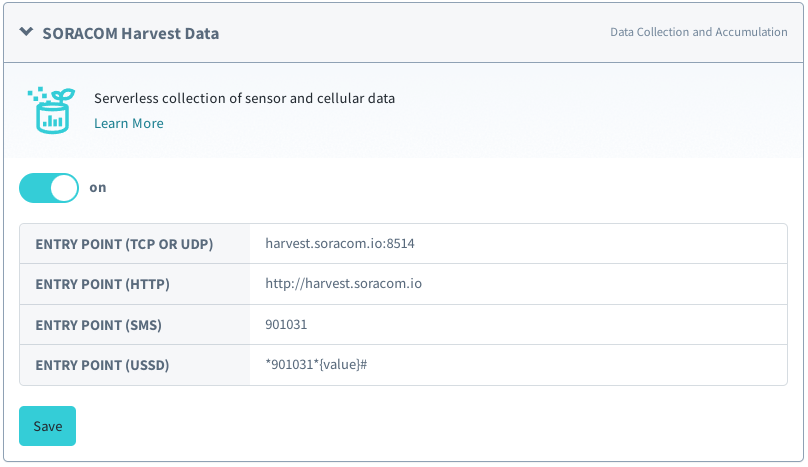
The Harvest Data configuration is now complete.
HTTP Example Sketch
In the Arduino IDE, create a new sketch and paste in the following code:
#include <Arduino.h>

#include <esp_mac.h>

#include <WalterModem.h>

/**

 * @brief Defines what modem HTTP profile is being used.

 */

#define HTTP_PROFILE 1

/**

 * @brief The modem instance.

 */

WalterModem modem;

/**

 * @brief Walter ID formed by prefix + MAC address.

 *        Used in the HTTP POST message.

 */

char clientId[25] = "walter-";

/* Fetch Walter's MAC address */

void fetchMacAddress() {

  uint8_t macBuf[6];

  char macStr[18];

  esp_read_mac(macBuf, ESP_MAC_WIFI_STA);

  sprintf(macStr, "%02X:%02X:%02X:%02X:%02X:%02X",

          macBuf[0], macBuf[1], macBuf[2], macBuf[3], macBuf[4], macBuf[5]);

  strcat(clientId, macStr);

  Serial.printf("Walter's MAC is: %s\r\n", macStr);

}

void setup() {

  Serial.begin(115200);

  delay(5000);

  Serial.print("Walter Soracom Unified HTTP test\r\n");

  if(WalterModem::begin(&Serial2)) {

    Serial.print("Modem initialization OK\r\n");

  } else {

    Serial.print("Modem initialization ERROR\r\n");

    return;

  }

  fetchMacAddress();

  WalterModemRsp rsp = {};

  /* Create PDP context */

  if(modem.createPDPContext("soracom.io", WALTER_MODEM_PDP_AUTH_PROTO_PAP))

  {

    Serial.print("Created PDP context\r\n");

  } else {

    Serial.print("Could not create PDP context\r\n");

    return;

  }

  /* Set the operational state to full */

  if(modem.setOpState(WALTER_MODEM_OPSTATE_FULL)) {

    Serial.print("Successfully set operational state to FULL\r\n");

  } else {

    Serial.print("Could not set operational state to FULL\r\n");

    return;

  }

  /* Wait for the network to become available */

  WalterModemNetworkRegState regState = modem.getNetworkRegState();

  while(!(regState == WALTER_MODEM_NETWORK_REG_REGISTERED_HOME ||

          regState == WALTER_MODEM_NETWORK_REG_REGISTERED_ROAMING))

  {

    delay(100);

    regState = modem.getNetworkRegState();

  }

  Serial.print("Connected to the network\r\n");

  /* Configure HTTP connection */

  if(modem.httpConfigProfile(HTTP_PROFILE, "unified.soracom.io", 8888)) {

    Serial.print("Successfully configured the HTTP profile\r\n");

  } else {

    Serial.print("Failed to configure the HTTP profile\r\n");

  }

}

void loop() {

  static uint8_t counter = 0;

  static char outgoingMsg[64] = "";

  static char contentType[32] = "";

  static uint8_t responseBody[256] = { 0 };

  static short httpReceiveAttemptsLeft = 0;

  WalterModemRsp rsp = {};

  sprintf(outgoingMsg, "%s-%d", clientId, counter);

  if(!httpReceiveAttemptsLeft) {

    if(modem.httpSend(HTTP_PROFILE, "/", (uint8_t *) outgoingMsg, strlen(outgoingMsg), WALTER_MODEM_HTTP_SEND_CMD_POST,

                        WALTER_MODEM_HTTP_POST_PARAM_TEXT_PLAIN, contentType, sizeof(contentType))) {

      Serial.print("HTTP query performed\r\n");

      httpReceiveAttemptsLeft = 3;

      memset(responseBody, 0, sizeof(responseBody));

    } else {

      Serial.print("HTTP query failed\r\n");

    }

  } else {

    if(modem.httpDidRing(HTTP_PROFILE, responseBody, sizeof(responseBody), &rsp)

        || rsp.result == WALTER_MODEM_STATE_NO_DATA) {

      httpReceiveAttemptsLeft = 0;

      Serial.printf("HTTP status code: %d\r\n", rsp.data.httpResponse.httpStatus);

      Serial.printf("Content-Type: %s\r\n", contentType);

      Serial.printf("Body: [%s]\r\n", responseBody);

      counter++;

    } else {

      httpReceiveAttemptsLeft--;

      Serial.print("HTTP response not yet received\r\n");

    }

  }

  delay(5000);

}Code language: PHP (php)
Then, connect the Walter board to your computer. Ensure that the board settings configured earlier in the article are still set, and upload the sketch.
Once the IDE shows that the sketch has been uploaded, the Walter will reset and begin running it. Remember that logging from the sketch can be viewed while it runs, and the 201 HTTP return code can be seen from Harvest Data. The empty body is expected when receiving replies from Harvest Data.

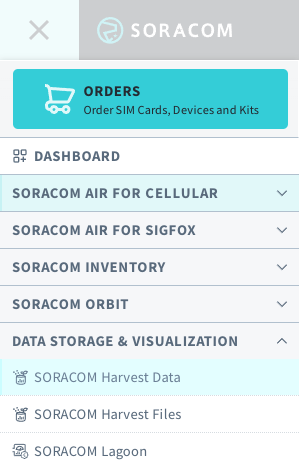
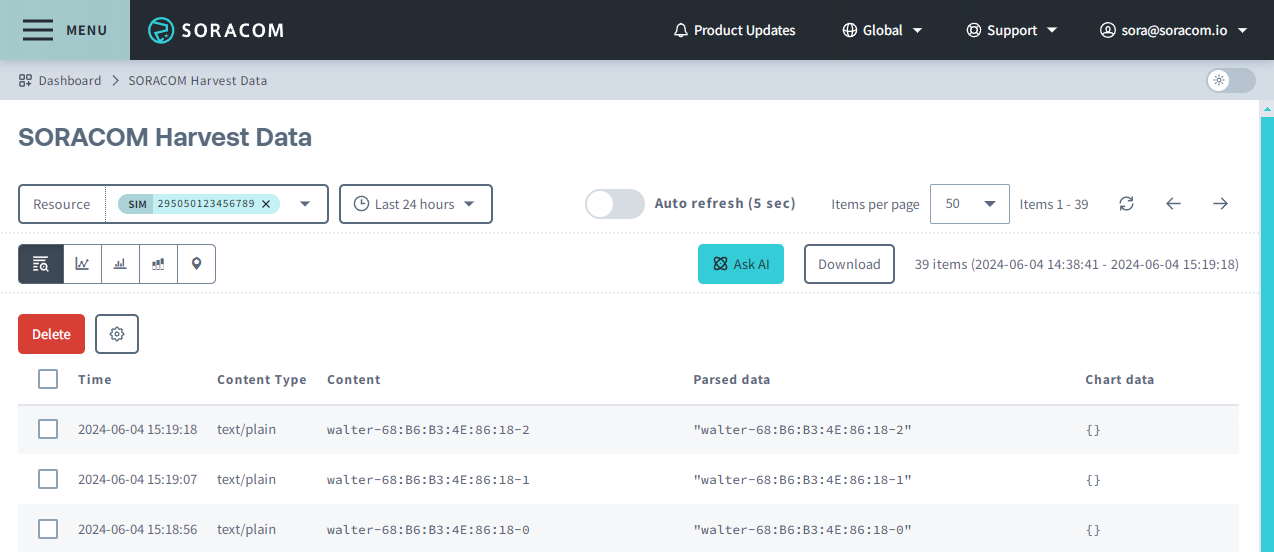
To view this data in the Soracom User Console, log in to your account, open the Menu, and select Soracom Harvest Data under the Data Storage & Visualization header.
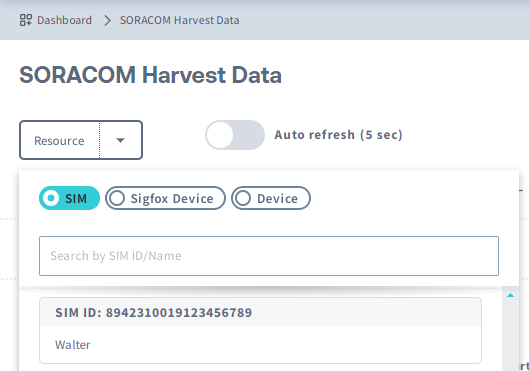
Next, select the SIM being used in the Walter from the Resource dropdown list.
Data being sent from the Walter should now be visible.
What Else is Possible?
Now that Harvest Data has been used to quickly verify that the Walter is sending the expected data, the Group can be reconfigured to enable other services without modifying the sketch thanks to Unified Endpoint. For example, without needing to modify the device sketch, this MAC address data could be sent to:
Slack via AWS Lambda using Soracom Funk (If following the guide, make sure to change the Funk Content Type to text)
AWS IoT using Soracom Funnel (While this guide is for MQTT, AWS IoT also supports HTTPS data. Funnel will add TLS in the cloud)
Soracom and our partner DPTechnics can’t wait to see what you build with the wonderful Walter!
For more information about Walter, please visit our dedicated product page.
…………………………
Want to learn more about how Walter and Soracom work together? Check out our recent webinar, where DPTechnics’ own Daan Pape speaks with us about this exciting new development in connected technologies.