
AI-Powered Inventory Monitoring with Raspberry Pi and Soracom Flux

Managing inventory efficiently may potentially require a trade-off between accuracy and hardware complexity. Traditional approaches rely on dedicated sensors for each container (i.e.weight sensors, volume sensors, or both), which can quickly drive up costs and deployment effort.
At Soracom Discovery 2025, we showcased a solution to this challenge that, through it’s unique simplicity, proved to be one of the most popular demos in the prototyping corner. In this article, we’ll walk through how to build this solution using a Raspberry Pi, a camera, an Onyx LTE USB Dongle, and Soracom services.
By capturing images of multiple containers, analyzing them with an AI model, and automatically sharing results in Slack, you can monitor stock levels remotely without needing a sensor on every bin.
How It Works
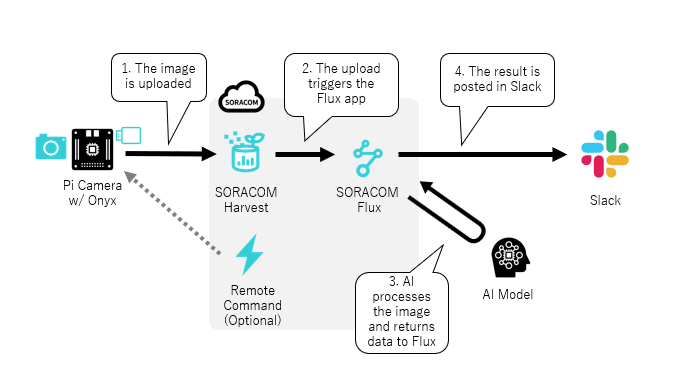
In this setup, a Raspberry Pi 3 with a camera module will capture images of storage containers and transmit them over a cellular connection using the Soracom Onyx LTE™ USB Modem. Images are stored in Soracom Harvest Files and processed through Soracom Flux, which invokes an AI model to estimate inventory levels. The results are then posted directly into Slack for immediate visibility.
Soracom Remote Command can also be used to execute image upload, allowing for on-demand checks. This architecture reduces device requirements, centralizes monitoring, and makes it easy to add AI-driven insights into your operations.
Example Use Case: Smart Restaurant
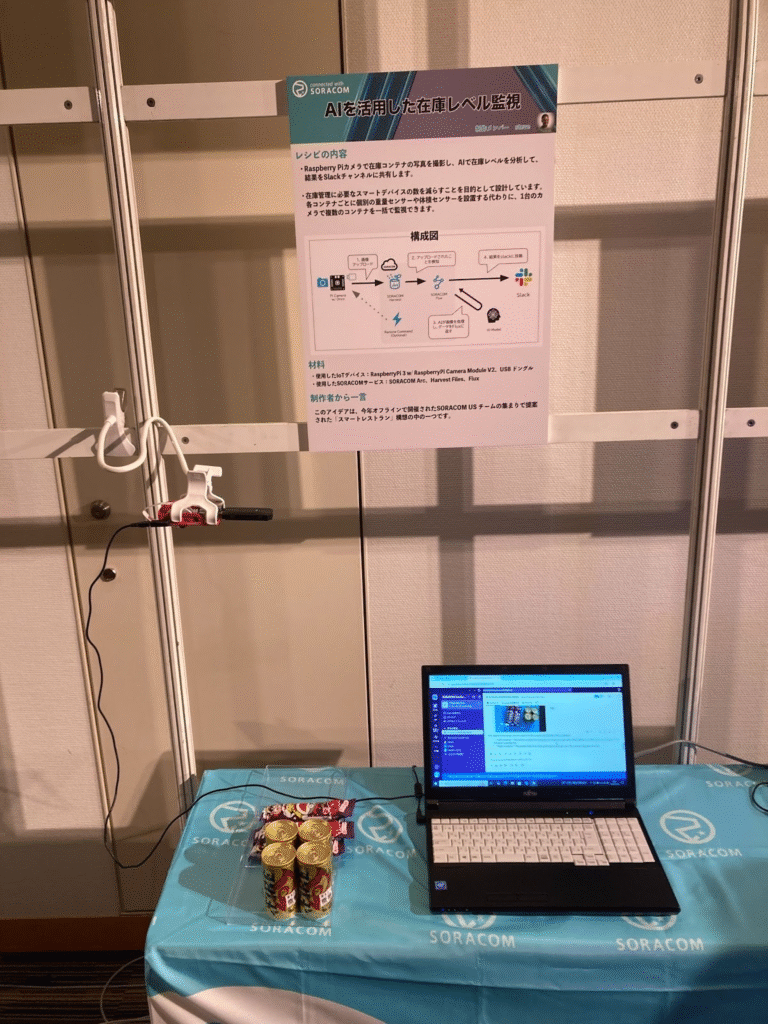
This prototype was originally conceived by the Soracom US team as part of a “Smart Restaurant” initiative. The goal was to monitor pantry stock levels without needing dozens of individual sensors. Using only a camera and cellular connection, multiple storage containers could be tracked at once, and staff could receive instant updates whenever supplies ran low.
Next, we’ll dive into the setup process, showing you how to configure Soracom Flux to handle image uploads, integrate AI processing, and send results to Slack step by step.
Setting Up the Raspberry Pi and Camera
To get started, you’ll need to configure your Raspberry Pi with the necessary software and connect the Soracom Onyx LTE™ USB Modem.
Initial Setup
First, install Raspberry Pi OS on your device using Raspberry Pi Imager. Once your Pi is up and running, you’ll need to set up the Onyx following the setup script instructions in the Soracom Onyx LTE USB Modem Software Setup guide.
This script will configure your modem and establish the cellular connection.
Installing Camera Dependencies
The Raspberry Pi camera requires the picamera2 package. Install it with the following command:
sudo apt update

sudo apt install -y python3-picamera2
Creating the Image Capture Script
Create a Python script that will capture images and upload them to Soracom Harvest Files.
import time

import os

import requests

from picamera2 import Picamera2

# ——— Configuration ———

UPLOAD_URL = "http://harvest-files.soracom.io/"

HEADERS = {"Content-Type": "image/jpeg"}

# ————————————

def capture_and_upload():

    # 1) Timestamped filename. Harvest will automatically rename the file, but this can be helpful for tracking purposes

    timestamp = time.strftime("%Y%m%d_%H%M%S")

    filename = f"{timestamp}.jpg"

    # 2) Set up the camera for a still at 1920×1080

    picam2 = Picamera2()

    config = picam2.create_still_configuration(main={"size": (1920, 1080)})

    picam2.configure(config)  # apply the still-capture settings :contentReference[oaicite:0]{index=0}

    # 3) Warm up

    picam2.start()

    time.sleep(2)

    # 4) Capture straight to a JPEG file

    picam2.capture_file(filename)  # writes test.jpg as a JPEG :contentReference[oaicite:1]{index=1}

    picam2.close()

    # 5) Upload it

    with open(filename, "rb") as f:

        resp = requests.put(UPLOAD_URL, data=f, headers=HEADERS)

    # 6) Clean up local file if upload succeeded

    if resp.ok:

        print(f"{timestamp}: Upload successful")

        os.remove(filename)

    else:

        print(f"{timestamp}: Upload failed (HTTP {resp.status_code})")

if __name__ == "__main__":

    capture_and_upload()Code language: PHP (php)
Automating Image Capture with Cron
To capture images automatically every 30 minutes, set up a cron job. Open the crontab editor:
crontab -eAdd the following line to run the script every 30 minutes:
*/30 * * * * /usr/bin/python3 /path/to/your/script.pyCode language: JavaScript (javascript)You can adjust the schedule as needed by modifying the cron expression.
Additionally, if you need an image captured immediately rather than waiting for the next scheduled run, you can trigger the script on-demand using Soracom Remote Command (covered later in this article).
You will also need to secure the camera in a way that it can see the stock containers. In our case, we used a gooseneck smartphone holder to achieve this.
Configuring Soracom Harvest Files and Flux
With the hardware configured, it’s time to set up the Soracom services that will store, process, and deliver your inventory insights.
Enabling Harvest Files
First, you’ll need to associate your SIM card with a group and enable Harvest Files:
- Place the SIM card from your Onyx into a Soracom group
- Enable Harvest Files for that group and set the Default Path to
/flux/latest.jpg
For detailed instructions on this process, refer to the Soracom Harvest Files Configuration documentation.
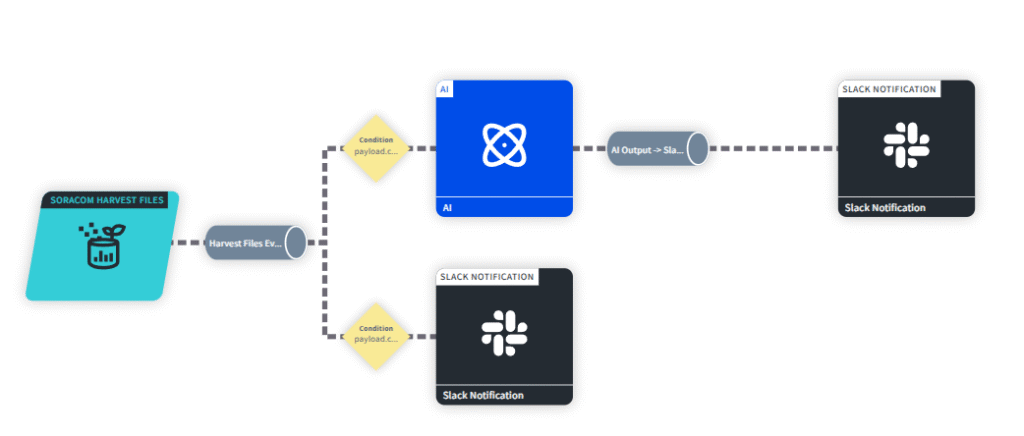
Creating the Flux Application
Soracom Flux is where the magic happens. It orchestrates the flow from image upload to AI analysis to Slack notification. Here’s how to set it up:
Step 1: Create the Harvest Files Event Source
- In Soracom Flux, create a new application
- Add a Soracom Harvest Files channel
- In the Event source config section:
- Set the file path prefix as
/flux/latest.jpg - Check both “File Created” and “File Updated” for Event Types
- Set the file path prefix as
This configuration means the event source will trigger whenever the /flux/latest.jpg file is created or updated, ensuring your Flux app processes each new image as it arrives.
Step 2: Add AI Analysis
- From the Actions tab of your newly created Harvest Files Event Channel create an AI action
- Set the Action Condition to
payload.contentType=="image/jpeg"so it only triggers when it is sent image files - Select your AI model for this demo, we’re using OpenAI GPT-4.1-mini
- Enter the following prompt:
Examine the attached image of stock containers. Do not describe the overall scene or restate what’s visible. Instead, provide a concise report in plain text without formatting detailing:

The fill level of each container as a percentage (e.g., 0%, 40%, 95%).

The contents of each container (identify or describe them as precisely as possible).

Note any differences in quantity, type, or condition among the containers.

Focus strictly on measurable and observable details.Code language: PHP (php)- Check Use image and set the expression as
${event.payload.presignedUrls.get}to pass the image from the Harvest Files event - In the Output section:
- Enable “Republish the action output to another channel”
- Choose “Create a new channel” and name it something like “AI Output -> Slack Channel”
Step 3: Send AI Results to Slack
- From the app overview screen, click on the new “AI Output -> Slack Channel”
- From the Actions tab of the channel create add a Slack Notification action
- In the Content section:
- Set the URL to your Slack channel’s incoming webhook URL (for more information about setting up webhooks, see Slack’s documentation on sending messages using incoming webhooks)
- Set the payload as
${payload.output.text}to send the AI-generated inventory report
Step 4 (Optional): Send the Image to Slack
To also see the original image alongside the AI analysis in Slack:
- From the app overview screen, click on the previously created ”Harvest Files Event Channel”
- From the Actions tab of the channel add a Slack Notification action
- Set the Action Condition as
payload.contentType=="image/jpeg" - In the Config section:
- Set the same Slack webhook URL
- Click Advanced Mode, and set the Payload as:
{

  "blocks": [

    {

      "type": "image",

      "alt_text": "camera image",

      "image_url": "${event.payload.presignedUrls.get}"

    }

  ]

}Code language: JSON / JSON with Comments (json)
Your finished Flux app will look like this:
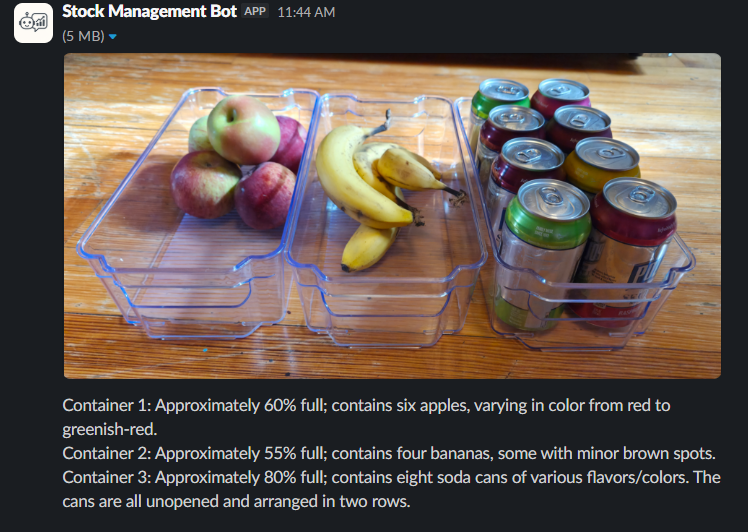
Viewing Results in Slack
Once configured, your Slack channel will automatically receive updates every time an image is captured and analyzed. You’ll see both the original container image and the AI-generated inventory report, making it easy for your team to monitor stock levels at a glance.
Triggering On-Demand Captures with Remote Command
While the cron job handles regularly scheduled monitoring, there may be times when you need more immediate, on-demand inventory checks. Soracom Remote Command allows you to execute the image capture script remotely without waiting for the next scheduled run.
To use Remote Command to trigger your script on demand, follow the instructions in the Soracom Remote Command SSH Usage documentation. This feature is particularly useful when you need to verify stock levels before placing an order or responding to a specific inquiry from your team.
Conclusion
This AI-powered inventory monitoring system demonstrates how modern IoT services can simplify traditionally complex monitoring tasks. By combining a Raspberry Pi camera, cellular connectivity through the Soracom Onyx LTE™ USB Modem, and cloud-based AI processing via Soracom Flux, you can track multiple containers with a single device, eliminating the need for individual sensors on each bin.
The system is cost-effective, scalable, and easy to deploy. As your needs grow, you can simply point the camera at more containers or deploy additional camera units without rewiring or adding new sensor infrastructure. The integration with Slack ensures your team stays informed in real-time, and Remote Command provides flexibility for on-demand checks.
Whether you’re managing a restaurant pantry, warehouse supplies, or retail stock, this approach offers a practical path to smarter inventory management with minimal hardware investment.
Got a question about Soracom? Whether you’re an existing customer, interested in learning more about our products and services, or want to learn about our Partner program – we’d love to hear from you!


MORE LIKE THIS


What is Soracom?
Discover why technology innovators choose Soracom for connecting their
devices to the cloud over cellular.

Soracom's Picks
Advices and interviews, to inform and inspire.


The Bill Shock Prevention Checklist: 4 Ways to Stop Idle Connectivity Spend and Overage
Whilst theft accounts for over $1 billion dollars in losses…

IoT Connectivity for Construction Sites: Fiber vs. Satellite vs. Cellular (4G/5G)
The Site Manager’s Dilemma: Speed vs. Stability vs. Security When…

Why Network-Agnostic Connectivity is the Lifeblood of Physical AI
In the world of enterprise IoT, we are witnessing a…


Champion in IoT
Connectivity Management
Soracom Named as a Champion for IoT Connectivity Management in 2023 Kaleido Intelligence Connectivity Vendor Hub